Materials:
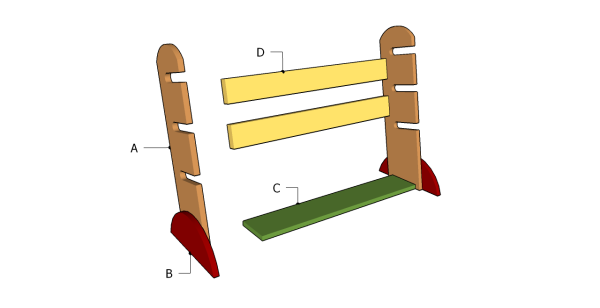
A – 2 pieces of 1×8 lumber – 28″ long SIDES
B – 12 pieces of 1×6 lumber – 14″ long SIDE SUPPORTS
C – 2 pieces of 1×4 lumber – 31″ long BOTTOM SUPPORT
D – 1 piece of 1×6 lumber – 31″ long BACK SUPPORT
Making your own skateboard rack can not only be a blast, but also be a great bonding experience for a father and son or a couple of buddies.
This guide will help you build a simple skateboard rack complete with diagrams and step by step instructions, to ensure by the end that you have a rack that's stable and something you're proud of.
Please note, it's critical to choose the right substances in the beginning of development. It's best to select long lasting lumber with a smooth appearance. Double check that the wood you buy is not warped or damaged.
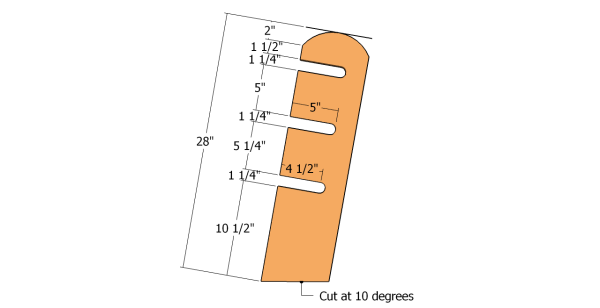
Step 1. Building the sides of the rack
First, you're going to want to build the edges of the skateboard rack. You can either use a circular saw or jigsaw to cut out the slots where your boards will go. Make sure to sand down all the rough edges. Use the diagram above for a reference.
Make the curved cuts using a jigsaw and dispose of the residues with a vacuum. Don't be afraid to adjust the dimensions depending on your needs, some people add more slots that are closer together if you're storing decks without trucks and wheels.
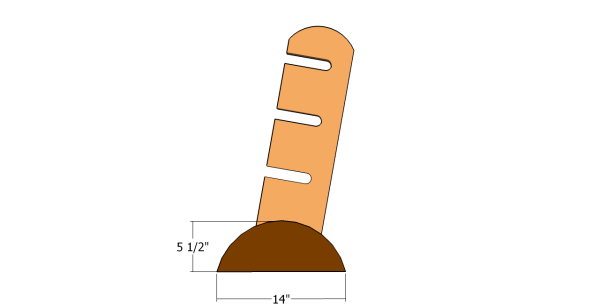
Step 2. Build the Facet Legs
Next up is to build the facet legs for the wooden rack. If you want your rack to look professionally done, we highly recommend you use a jigsaw for this part.
Use fine-grit sandpaper to smooth out your cuts and round off the facet legs. To attach the legs to the edges, drill pilot holes and insert 1.25" screws to create a rigid bond. You can also add wood glue to the joints to enhance stability.

Step 3. Build the backing
Lock the two sides of the rack together using 1x4 wood beams to support the rack. Drill pocket holes at both ends of the supports and align them carefully, before securing them to the sides by using 1 1/4″ screws and waterproof glue.
Leave no gaps between the components and make sure the whole structure is rigid. Make sure the edges are flush one with another.
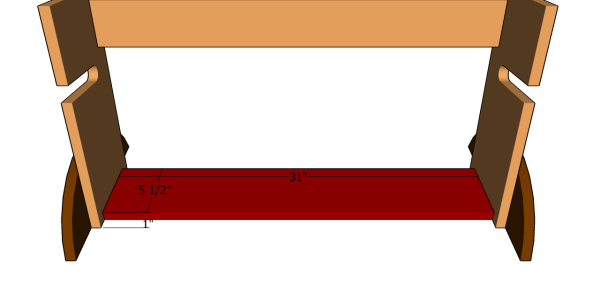
Step 4. Build the Bottom
For the bottom support, make sure to use a 1x6 instead of a 1x4 piece of wood. This will allow much more stability for the rack. Drill pocket holes at each ends of the 1×6 slat and match it between the edges of the rack. Insert 1 1/four″ screws into the perimeters and apply glue to the joints.
Finish by sanding with fine-grit sandpaper, and then either paint or stain the wood depending on your preference.